Have you ever felt stuck because you didn’t know how to add an element to an array in JavaScript? You’re not alone. This skill is crucial for anyone diving into JavaScript programming. In this article, we’ll unlock the secrets of JavaScript arrays, guiding you through dynamic array operations like a pro. By mastering a few simple methods, you’ll easily enhance your coding projects.
To add an element to an array in JavaScript, use the .push() method for adding to the end or .unshift() for the beginning.
Stay with us to transform your array manipulation skills.
How to Add Element to Array in Javascript
There are myriad ways to append an element to an array in JavaScript. Follow the few key methods below.
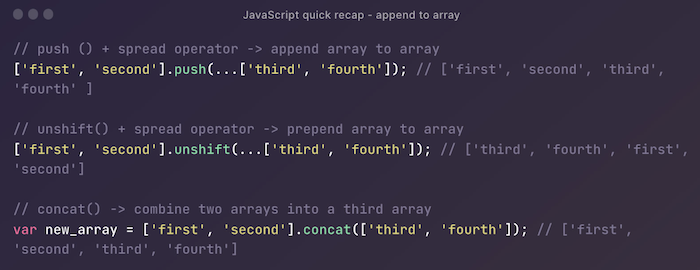
Use push() Method
The push() method is a powerful tool for adding elements to the end of an array in JavaScript. It’s simple, efficient, and widely used in various programming scenarios.
To add a single element, you simply call the method with the element as an argument:
let fruits = ['apple', 'banana'];

fruits.push('orange');

console.log(fruits); // Output: ['apple', 'banana', 'orange']
But push() is not limited to adding just one element. You can add multiple elements at once:
fruits.push('grape', 'pineapple');

console.log(fruits); // Output: ['apple', 'banana', 'orange', 'grape', 'pineapple']
This flexibility makes push() an essential method for dynamic array operations. Whether you’re working with small arrays or large data sets, push() helps you manage your arrays effectively.
One of the best things about push() is its return value. It gives you the new length of the array, which can be handy in loops and other control structures:
let newLength = fruits.push('mango');

console.log(newLength); // Output: 6
The push() is generally fast when it comes to performance. However, if you’re adding elements to a very large array, it’s a good idea to monitor performance and consider alternative methods if necessary.
Regarding compatibility, push() is supported in all modern browsers and has been a part of JavaScript since ECMAScript 3. This means you can use it confidently in your projects without worrying about browser compatibility issues.
The push() method is a fundamental part of JavaScript array manipulation. Its simplicity, versatility, and efficiency make it a go-to tool for adding elements to the end of an array. Whether you’re a beginner or an experienced developer, mastering push() will enhance your coding skills and help you handle arrays more effectively.
The unshift() Method
Just as push() adds elements to the end of an array, the unshift() method adds elements to the beginning. This method shifts existing elements to higher indexes to accommodate the new ones.
Here’s a basic example:
let numbers = [2, 3, 4];

numbers.unshift(1);

console.log(numbers); // Output: [1, 2, 3, 4]
Like push(), unshift() can also add multiple elements at once:
numbers.unshift(-2, -1, 0);

console.log(numbers); // Output: [-2, -1, 0, 1, 2, 3, 4]
This flexibility makes unshift() an invaluable method for situations where you need to prepend elements to an array.
One thing to note about unshift() is its return value. It returns the new length of the array, which can be useful for tracking the size of the array after the operation:
let newLength = numbers.unshift(-3);

console.log(newLength); // Output: 8
Regarding performance, unshift() can be slower than push(), especially for large arrays. This is because existing elements need to be shifted to make room for new ones. If performance is a concern, consider alternative methods or data structures.
The unshift() technique is a powerful tool for appending elements to the beginning of an array. Its ability to handle multiple aspects and straightforward syntax make it a favorite among JavaScript developers. By mastering unshift(), you’ll gain more control over your arrays and be able to manipulate them more effectively in your projects.
Use The concat() Method
The concat() method is a bit different from push() and unshift(). Instead of modifying the original array, concat() creates a new array by merging two or more arrays. This non-destructive nature makes it ideal for situations where you need to preserve the original arrays.
Here’s a basic example:
let array1 = [1, 2, 3];

let array2 = [4, 5, 6];

let mergedArray = array1.concat(array2);

console.log(mergedArray); // Output: [1, 2, 3, 4, 5, 6]
Not only can concat() merge two arrays, but it can also merge multiple arrays in a single operation:
let array3 = [7, 8, 9];

let combinedArray = array1.concat(array2, array3);

console.log(combinedArray); // Output: [1, 2, 3, 4, 5, 6, 7, 8, 9]
This versatility makes concat() a powerful JavaScript array manipulation tool.
One of the advantages of concat() is that it doesn’t mutate the original arrays. This means you can use it without worrying about unintended side effects:
console.log(array1); // Output: [1, 2, 3]

console.log(array2); // Output: [4, 5, 6]
In addition to merging arrays, concat() can also be used to add individual elements to an array:
let newArray = array1.concat(4, 5, 6);

console.log(newArray); // Output: [1, 2, 3, 4, 5, 6]
This flexibility makes concat() a versatile tool for various array manipulation tasks.
When it comes to performance, concat() is generally efficient for small to medium-sized arrays. However, for very large arrays, it’s a good idea to test the performance and consider alternative methods if needed.
The concat() method is an essential part of JavaScript array manipulation. Its ability to merge arrays without mutating the original ones makes it a valuable tool for creating new arrays from existing ones. By understanding and utilizing concat(), you can handle array operations more effectively and write cleaner, more maintainable code.
Deep Dive into splice() Method
The splice() method is a versatile tool in JavaScript for adding, removing, and replacing elements in an array. It can modify an array in place, directly altering the original array.
To add elements using splice(), you specify the start index, set the delete count to 0, and then list the elements to add:
let colors = ['red', 'green', 'blue'];

colors.splice(1, 0, 'yellow', 'orange');

console.log(colors); // Output: ['red', 'yellow', 'orange', 'green', 'blue']
In this example, splice() adds ‘yellow’ and ‘orange’ at index 1 without removing any elements.
splice() is not limited to adding elements; it can also remove them:
colors.splice(2, 2);

console.log(colors); // Output: ['red', 'yellow', 'blue']
Here, it removes two elements starting from index 2.
Moreover, splice() can replace elements by removing some and adding others simultaneously:
colors.splice(1, 1, 'purple');

console.log(colors); // Output: ['red', 'purple', 'blue']
This replaces ‘yellow’ with ‘purple’ at index 1.
One of the unique features of splice() is its return value. It returns an array of the removed elements, which can be useful in various scenarios:
let removedColors = colors.splice(1, 2);

console.log(removedColors); // Output: ['purple', 'blue']
When using splice(), it’s important to consider its performance implications. Removing or adding elements in the middle can be costly for large arrays due to the need to shift elements. In such cases, alternative methods or data structures may be more suitable.
The splice() method is a powerful and flexible JavaScript array manipulation tool. Its ability to add, remove, and replace elements in a single operation makes it invaluable for complex array operations. Understanding and mastering splice() can take your array manipulation skills to the next level.
Advanced Techniques for Array Manipulation
Beyond basic methods like push(), unshift(), and splice(), there are advanced techniques in JavaScript that can enhance your array manipulation skills.
Setting Index Directly
One simple yet effective technique is adding elements by directly setting an array index. This is useful when you know the specific position where you want to insert an element:
let animals = ['dog', 'cat'];

animals[2] = 'rabbit';

console.log(animals); // Output: ['dog', 'cat', 'rabbit']
However, be cautious with out-of-bounds indexes, as they can create “holes” in the array:
animals[4] = 'fox';

console.log(animals); // Output: ['dog', 'cat', 'rabbit', undefined, 'fox']
In this case, index 3 is left undefined, which might lead to unexpected behavior.
Avoiding Duplicates
When adding elements, you might want to prevent duplicates. The includes() method is handy for this:
if (!animals.includes('cat')) {

animals.push('cat');

}

console.log(animals); // No duplicate 'cat' added
For more complex scenarios, JavaScript Sets can be used for unique element storage:
let uniqueAnimals = new Set(animals);

uniqueAnimals.add('elephant');

console.log(Array.from(uniqueAnimals)); // Converts back to an array
Sets automatically ensure uniqueness, simplifying the process of avoiding duplicates.
Modern JavaScript Array Manipulation
With the introduction of ECMAScript 6 (ES6), new features have enhanced array manipulation capabilities.
Spread Operator for Adding Elements
The spread operator (…) is a concise way to add elements. It’s particularly useful for combining arrays:
let moreAnimals = ['lion', 'giraffe'];

let combinedAnimals = [...animals, ...moreAnimals];

console.log(combinedAnimals);
It can also be used to insert elements at any position:
let insertedAnimals = [...animals.slice(0, 2), 'bear', ...animals.slice(2)];

console.log(insertedAnimals);
This technique maintains immutability, creating a new array without altering the original.
FAQs
How do I add an element to a specific position in a JavaScript array?
Use the splice() method: array.splice(index, 0, element); where index is the position and element is the item to add.
Can you add multiple elements to an array in JavaScript?
Yes, use push() for multiple elements at the end: array.push(element1, element2); or unshift() for the beginning.
How do you combine two arrays in JavaScript?
You can use the concat() method to merge two arrays in JavaScript: let newArray = array1.concat(array2);.
What is the difference between push and unshift in JavaScript?
The push() method adds elements to the very end of an array, whereas unshift() adds them to the beginning.
How do you add an element to an array without mutating it in JavaScript?
Use concat() or the spread operator: let newArray = array.concat(element);.
Conclusion
In conclusion, understanding how to add elements to an array in JavaScript is essential for effective array manipulation. Mastering methods like push(), unshift(), and splice() and using advanced techniques like the spread operator can help you handle arrays with ease. Experiment with these methods, consider performance implications and adopt best practices to enhance your JavaScript programming skills. Embrace these techniques to make your arrays work harder for you.
See Also: React Vs Javascript: Which is the Best Language To Learn?

Hi, I’m Geoff. I design. I develop. I do lots of things in between. What that really boils down to is that I make websites.